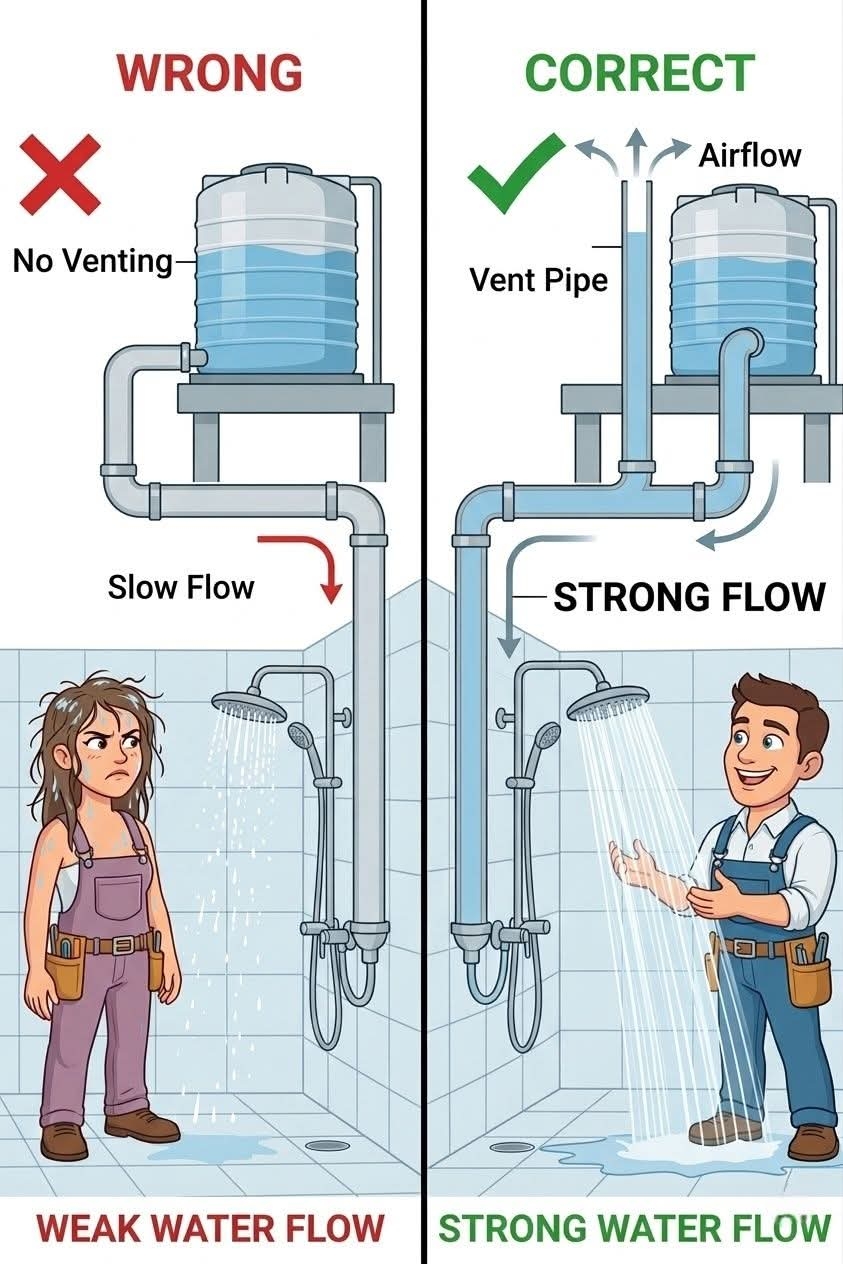




• This is the #1 reason for **low shower pressure from roof tank** - and fix costs just 1 extra pipe!


    **LEFT - WRONG - No Vent Pipe = Slow Flow ❌**


    Tank on roof, pipe goes directly down to shower. No air entry.


    What happens:
    - Water tries to go down, but air gets trapped inside pipe - like putting finger on top of a straw, water won’t fall.
    - Pipe creates air lock / vacuum. Water has to fight air to come out.
    - Result: Weak, slow shower, even though tank is full.


    **RIGHT - CORRECT - Extra Vent Pipe = Strong Flow ✅**


    One extra vertical pipe added, higher than tank top, open to air. See labels:


    - **Extra Vent Pipe** - Connects to main down pipe
    - **Air Escape** - Blue arrows UP from tank and vent


    How it fixes:
    - When water goes down to shower, air from this vent pipe goes IN behind water, pushing it down.
    - No air lock. Water flows freely with gravity.
    - Also, air trapped in tank escapes through small pipe on tank top.


    Result: Same tank, same height, but **3x stronger flow**.


    **Installation Rules:**


    1. Vent pipe diameter = same as main pipe (1 inch)
    2. Vent height = 1 foot higher than tank lid
    3. Top of vent = open, with U-bend to stop dust/birds
    4. Connect vent as close to tank down-takeoff as possible


    Cost: 10 feet pipe + elbow = very cheap, but shower feels like pressure pump!


    Try this before buying a pump motor.


    #plumbing #waterpressure #watertank

    This is the #1 reason for **low shower pressure from roof tank** - and fix costs just 1 extra pipe! **LEFT - WRONG - No Vent Pipe = Slow Flow ❌** Tank on roof, pipe goes directly down to shower. No air entry. What happens: - Water tries to go down, but air gets trapped inside pipe - like putting finger on top of a straw, water won’t fall. - Pipe creates air lock / vacuum. Water has to fight air to come out. - Result: Weak, slow shower, even though tank is full. **RIGHT - CORRECT - Extra Vent Pipe = Strong Flow ✅** One extra vertical pipe added, higher than tank top, open to air. See labels: - **Extra Vent Pipe** - Connects to main down pipe - **Air Escape** - Blue arrows UP from tank and vent How it fixes: - When water goes down to shower, air from this vent pipe goes IN behind water, pushing it down. - No air lock. Water flows freely with gravity. - Also, air trapped in tank escapes through small pipe on tank top. Result: Same tank, same height, but **3x stronger flow**. **Installation Rules:** 1. Vent pipe diameter = same as main pipe (1 inch) 2. Vent height = 1 foot higher than tank lid 3. Top of vent = open, with U-bend to stop dust/birds 4. Connect vent as close to tank down-takeoff as possible Cost: 10 feet pipe + elbow = very cheap, but shower feels like pressure pump! Try this before buying a pump motor. #plumbing #waterpressure #watertank
    0 Commentarios 0 Acciones 2 Views 0 Vista previa
  • A 20x30 metal building provides exactly 600 square feet of floor space. With a 14-foot ceiling height, you can enjoy expansive, open-concept living ceilings or utilize the vertical clearance for HVAC ductwork and lighting.
    Designing a 2-bedroom, 2-bathroom layout in 600 square feet requires a highly efficient, space-saving split floor plan to eliminate wasted hallway space and maximize comfort.
    ------------------------------
    ## 🗺️ Floor Plan Blueprint Overview


    * Total Footprint: 20' Width x 30' Length
    * Total Area: 600 Sq. Ft.
    * Ceiling Height: 14' (Ideal for high ceilings, transom windows, or ceiling fans)


    +------------------------ 30' ------------------------+


    | BEDROOM 2 | KITCHEN & DINING | BATH |
    | 10' x 10' | 14' x 10' | 1 | 20'
    | | | 6'x10' |
    |------- --------+ | |
    | BATH 2 | CLOSET| +--------|
    | 6'x6' | 4'x6' | LIVING ROOM | MASTER |
    |--------- -------+ 14' x 10' | BEDROOM|
    | ENTRYWAY | | 10'x10'|
    +-----------------------------------------------------+


    ------------------------------
    ## 📐 Room-by-Room Dimensions


    * Open-Concept Living & Family Room: 14' x 10' (140 sq ft)
    * Situated in the center-front of the home for an open, welcoming entryway.
    * Kitchen & Dining Area: 14' x 10' (140 sq ft)
    * Positioned along the back wall in the center, sharing a plumbing wet-wall with Bathroom 1.
    * Master Bedroom (Right Wing): 10' x 10' (100 sq ft)
    * Space for a queen bed, built-in closet storage, and direct access to Bathroom 1.
    * Primary Bathroom (En-Suite/Shared Right): 6' x 10' (60 sq ft)
    * Accommodates a standard 60-inch tub/shower combo, vanity, toilet, and stackable washer/dryer unit.
    * Bedroom 2 (Left Wing): 10' x 10' (100 sq ft)
    * Features a built-in reach-in closet (4' x 6').
    * Bathroom 2 (Left Wing): 6' x 6' (36 sq ft)
    * Compact full bathroom featuring a corner stand-up shower stall, toilet, and space-saving floating vanity.


    ------------------------------
    ## 🚰 Plumbing Layout (Wet-Wall Optimization)
    To save on foundation plumbing trenches and materials, this layout utilizes two efficient core wet-walls:


    * Right Wet-Wall (Shared Kitchen & Bathroom 1):
    * A single main 4-inch drain stack service lines run along the back center partition.
    * Connects the kitchen sink, dishwasher, bathroom vanity, toilet, and tub/shower in a straight horizontal run.
    * Left Wet-Wall (Bathroom 2):
    * Houses the drain and supply drops for the corner shower, toilet, and sink.
    * Strategically aligned near the front left corner for a direct exterior sewer main link.
    * Water Heater: A tankless electric on-demand water heater is mounted on the wall in Bathroom 1 to eliminate bulky footprint requirements.


    ------------------------------
    ## ⚡ Electrical & Lighting Strategy
    Given the 14-foot metal building framing, wiring should run through interior wood stud framing walls (built inside the metal skin insulation barrier).


    * Service Panel: 200-Amp main distribution panel located in the left hallway or Bathroom 2 closet.
    * Living Room & Kitchen:
    * Flush-mounted LED recessed lighting grids to keep the high ceilings looking clean.
    * Dedicated 20A appliance circuits for the kitchen countertop receptacles, refrigerator, and range.
    * Bedrooms:
    * Dual wall switches near entryways controlling modern ceiling fans with integrated lighting kits.
    * Arc-Fault Circuit Interrupter (AFCI) protected outlets spaced every 6–8 feet along baseboards.
    * Bathrooms:
    * Ground-Fault Circuit Interrupter (GFCI) protected outlets directly next to vanities.
    * Dedicated exhaust fans vented directly outside through the metal building sidewalls.
    A 20x30 metal building provides exactly 600 square feet of floor space. With a 14-foot ceiling height, you can enjoy expansive, open-concept living ceilings or utilize the vertical clearance for HVAC ductwork and lighting. Designing a 2-bedroom, 2-bathroom layout in 600 square feet requires a highly efficient, space-saving split floor plan to eliminate wasted hallway space and maximize comfort. ------------------------------ ## 🗺️ Floor Plan Blueprint Overview * Total Footprint: 20' Width x 30' Length * Total Area: 600 Sq. Ft. * Ceiling Height: 14' (Ideal for high ceilings, transom windows, or ceiling fans) +------------------------ 30' ------------------------+ | BEDROOM 2 | KITCHEN & DINING | BATH | | 10' x 10' | 14' x 10' | 1 | 20' | | | 6'x10' | |------- --------+ | | | BATH 2 | CLOSET| +--------| | 6'x6' | 4'x6' | LIVING ROOM | MASTER | |--------- -------+ 14' x 10' | BEDROOM| | ENTRYWAY | | 10'x10'| +-----------------------------------------------------+ ------------------------------ ## 📐 Room-by-Room Dimensions * Open-Concept Living & Family Room: 14' x 10' (140 sq ft) * Situated in the center-front of the home for an open, welcoming entryway. * Kitchen & Dining Area: 14' x 10' (140 sq ft) * Positioned along the back wall in the center, sharing a plumbing wet-wall with Bathroom 1. * Master Bedroom (Right Wing): 10' x 10' (100 sq ft) * Space for a queen bed, built-in closet storage, and direct access to Bathroom 1. * Primary Bathroom (En-Suite/Shared Right): 6' x 10' (60 sq ft) * Accommodates a standard 60-inch tub/shower combo, vanity, toilet, and stackable washer/dryer unit. * Bedroom 2 (Left Wing): 10' x 10' (100 sq ft) * Features a built-in reach-in closet (4' x 6'). * Bathroom 2 (Left Wing): 6' x 6' (36 sq ft) * Compact full bathroom featuring a corner stand-up shower stall, toilet, and space-saving floating vanity. ------------------------------ ## 🚰 Plumbing Layout (Wet-Wall Optimization) To save on foundation plumbing trenches and materials, this layout utilizes two efficient core wet-walls: * Right Wet-Wall (Shared Kitchen & Bathroom 1): * A single main 4-inch drain stack service lines run along the back center partition. * Connects the kitchen sink, dishwasher, bathroom vanity, toilet, and tub/shower in a straight horizontal run. * Left Wet-Wall (Bathroom 2): * Houses the drain and supply drops for the corner shower, toilet, and sink. * Strategically aligned near the front left corner for a direct exterior sewer main link. * Water Heater: A tankless electric on-demand water heater is mounted on the wall in Bathroom 1 to eliminate bulky footprint requirements. ------------------------------ ## ⚡ Electrical & Lighting Strategy Given the 14-foot metal building framing, wiring should run through interior wood stud framing walls (built inside the metal skin insulation barrier). * Service Panel: 200-Amp main distribution panel located in the left hallway or Bathroom 2 closet. * Living Room & Kitchen: * Flush-mounted LED recessed lighting grids to keep the high ceilings looking clean. * Dedicated 20A appliance circuits for the kitchen countertop receptacles, refrigerator, and range. * Bedrooms: * Dual wall switches near entryways controlling modern ceiling fans with integrated lighting kits. * Arc-Fault Circuit Interrupter (AFCI) protected outlets spaced every 6–8 feet along baseboards. * Bathrooms: * Ground-Fault Circuit Interrupter (GFCI) protected outlets directly next to vanities. * Dedicated exhaust fans vented directly outside through the metal building sidewalls.
    0 Commentarios 0 Acciones 691 Views 0 Vista previa
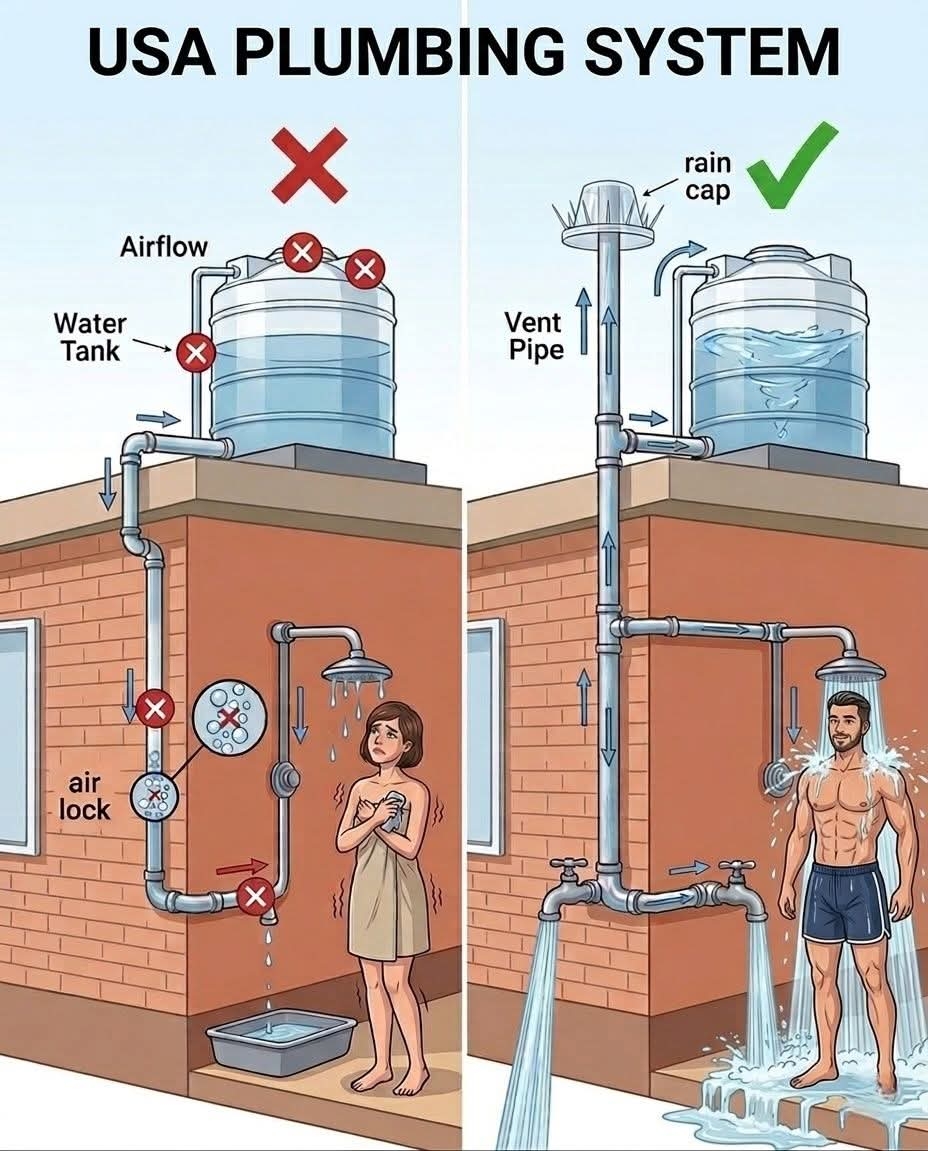
  • What’s Wrong (Left Side ❌)
    No proper vent pipe → Air can’t enter system, causing air lock
    Water flow becomes weak & uneven → shower pressure drops
    Vacuum forms inside pipes → interrupts smooth flow
    Tank airflow blocked → water doesn’t discharge properly
    Leaking & gurgling issues → long-term plumbing damage
    👉 Result: Low pressure, unstable flow, and user discomfort
    ✅ What’s Right (Right Side ✔️)
    Dedicated vent pipe installed → allows free air movement
    Rain cap on top → protects from dirt & rain entry
    Balanced air pressure → smooth and strong water flow
    No air lock issue → consistent shower performance
    Proper pipe routing → efficient and long-lasting system
    👉
    #PlumbingTips #WaterPressure #DIYFix #ConstructionLife #HomeImprovement #PlumbingWork
    What’s Wrong (Left Side ❌) No proper vent pipe → Air can’t enter system, causing air lock Water flow becomes weak & uneven → shower pressure drops Vacuum forms inside pipes → interrupts smooth flow Tank airflow blocked → water doesn’t discharge properly Leaking & gurgling issues → long-term plumbing damage 👉 Result: Low pressure, unstable flow, and user discomfort ✅ What’s Right (Right Side ✔️) Dedicated vent pipe installed → allows free air movement Rain cap on top → protects from dirt & rain entry Balanced air pressure → smooth and strong water flow No air lock issue → consistent shower performance Proper pipe routing → efficient and long-lasting system 👉 #PlumbingTips #WaterPressure #DIYFix #ConstructionLife #HomeImprovement #PlumbingWork
    0 Commentarios 0 Acciones 4K Views 0 Vista previa
  • Comparing water tank ventilation systems: Wrong vs. Correct setup.
    The wrong setup has no venting, leading to airlock and weak water flow (indicated by the red arrow). In contrast, the correct setup includes a vent pipe to allow proper airflow, ensuring a strong and consistent water flow (indicated by the blue arrow)."
    Some related hashtags could be:
    #plumbing #watertank #ventsystem #waterflow #construction #engineering #maintenance #diy #HomeImprovementNYC


    https://www.facebook.com/share/14ZyQAyg6qv/
    Comparing water tank ventilation systems: Wrong vs. Correct setup. The wrong setup has no venting, leading to airlock and weak water flow (indicated by the red arrow). In contrast, the correct setup includes a vent pipe to allow proper airflow, ensuring a strong and consistent water flow (indicated by the blue arrow)." Some related hashtags could be: #plumbing #watertank #ventsystem #waterflow #construction #engineering #maintenance #diy #HomeImprovementNYC https://www.facebook.com/share/14ZyQAyg6qv/
    0 Commentarios 0 Acciones 3K Views 0 Vista previa
  • I found this interesting so had to share…
    Home Buyer: I want a house built after 1980.
    Me: Actually, you don't.
    Let me explain.
    Newer isn't always better, and this picture sums it up pretty well. The quality of modern lumber is simply far inferior to the quality of lumber they were using to build homes in the early and mid-20th century. Wood quality began dropping on a serious scale in the 1980s due to old-growth timber being almost completely depleted.
    Most wood used today is grown very fast - not only can you visibly see the difference in quality, but the newer lumber is more prone to rotting due to a lack of heartwood. Slow growth wood yields much more heartwood, which is the longest lasting part of the tree, whereas sap wood (new growth wood) will rot very quickly. Modern lumber is also a lot more prone to termite damage as it is softer and easier to consume whereas old lumber is extremely resinous and naturally termite resistant. A good rule - as long as the plumbing and electric has been updated, a well-built home from the mid-20th century is a better investment and will likely outlast a newer build.
    Credit to the respective author
    https://www.facebook.com/share/p/15dZBS8xbM/
    I found this interesting so had to share… Home Buyer: I want a house built after 1980. Me: Actually, you don't. Let me explain. Newer isn't always better, and this picture sums it up pretty well. The quality of modern lumber is simply far inferior to the quality of lumber they were using to build homes in the early and mid-20th century. Wood quality began dropping on a serious scale in the 1980s due to old-growth timber being almost completely depleted. Most wood used today is grown very fast - not only can you visibly see the difference in quality, but the newer lumber is more prone to rotting due to a lack of heartwood. Slow growth wood yields much more heartwood, which is the longest lasting part of the tree, whereas sap wood (new growth wood) will rot very quickly. Modern lumber is also a lot more prone to termite damage as it is softer and easier to consume whereas old lumber is extremely resinous and naturally termite resistant. A good rule - as long as the plumbing and electric has been updated, a well-built home from the mid-20th century is a better investment and will likely outlast a newer build. Credit to the respective author https://www.facebook.com/share/p/15dZBS8xbM/
    0 Commentarios 0 Acciones 2K Views 0 Vista previa
  • Plumbing vents
    Plumbing vents
    0 Commentarios 0 Acciones 1K Views 0 Vista previa
  • How to Fix a Toilet | HomeTips
    Expert advice on how to repair a toilet, how to fix a clogged toilet, including using a snake or plunger to remove clogs, and stopping a toilet that runs #plumbing #plumber #leakyfaucet #drippingtoilet #cloggeddrain #waterdamage #sewerbackup #pipeburst #flooding #homerepai #diy #homeimprovement #handyman #contractor #newconstruction #remodeling #bathroomremodel #kitchenremodel #renovation #homeowner #homemaintenance #housecall

    https://www.facebook.com/share/p/DREQa8RfbGAabeUy/?mibextid=xfxF2i
    How to Fix a Toilet | HomeTips Expert advice on how to repair a toilet, how to fix a clogged toilet, including using a snake or plunger to remove clogs, and stopping a toilet that runs #plumbing #plumber #leakyfaucet #drippingtoilet #cloggeddrain #waterdamage #sewerbackup #pipeburst #flooding #homerepai #diy #homeimprovement #handyman #contractor #newconstruction #remodeling #bathroomremodel #kitchenremodel #renovation #homeowner #homemaintenance #housecall https://www.facebook.com/share/p/DREQa8RfbGAabeUy/?mibextid=xfxF2i
    0 Commentarios 0 Acciones 9K Views 0 Vista previa
Friendys - Connect, Share, and Make New Friends https://friendys.net